Monday 25 March 2019

happy craft challenge - march entry

hi  all
how are you , feeling crafty  ? ? ??
its a dull  day here in queensland , dont feel like doing much  today,  then i remembered i haven't  added my  project,
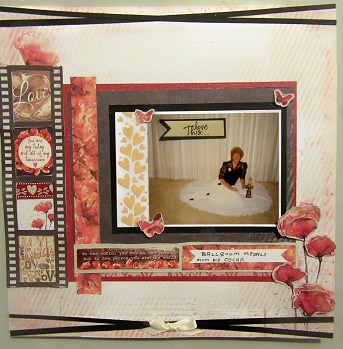
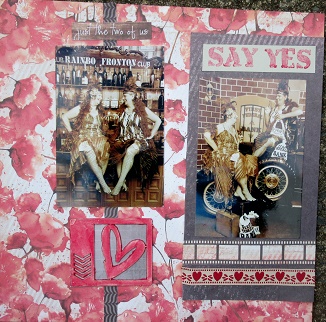
i recently went to a meet & greet of my primary school  well   some  were in my grade 2 class  others in  grades below me  but had a  nice time  took some really  nice photos , and thought , i have  3 albums that  i bought at spotlight   on special , i thought i would cover one  to tell   them apart,
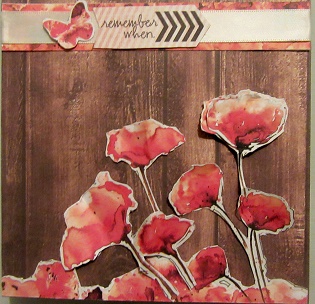
   In  my working days &  my hobby was  floral art & bridal bouquets,  i had  several   bouquets  made up for  protential  brides to see.  not wanting to throw them away, a very good friend suggested i cut them  up and use them as layouts , and such,   which  will last me a lifetime  can not rush these things,  so  on the weekend , i got our my favourite Kaiser papers  Indigo Skies and covered the album ,  at the Crafty Chain they  had a market day, and  of course i can not pass up anything blue , so  found some   pretty blue lace
In my stash i have some plastic  glitter   lace, which i have also added,  im  starting to use  my stash as im getting older i  might not get all the enjoyment  i want  out of  it , my sister and hubby , want me to down size, and throw out   which   makes me  anxious,  so trying   to rush and get them all on  albums   layouts  mini  albums,  in case we  move also   to a smaller place in coming years  (  NOT YET )   i m not ready yet  lol
so  for my entry to  happy craft creations anything goes,  im adding my  album cover  for a change  instead of a layout
I have used  Kaisers  Indigo Skies  papers
  Kaiser   black  flourish
Kaiser  Rub ons  We do not remember  days  we remember  the moments    which   i think  is  very fitting for the album   and some   flowers  and  swirls from my stash
I have used   indigo skies   collectables  i have inked them with green    dew drop  inks
i have also used  the sticker sheet of  indigo skies for the  leavy   at the bottom,
The clock is   Kaiser from Timeless collectables
The chipboard is from  Imaginarium
hope you like it as much as i loved creating it
until next time
happy crafting
jacqui

Sunday 17 March 2019

wedding mini album

 hi all ,

  well we had a  nice sprinkle of rain recently,   like almost  3 inches to help  keep the gardens  growing again

 ive been working  on  doing mini albums  at first i found that ohh they take too much time , but when my hubby said recently  that  he was going to throw out all my albums (  giving me a fit ) and then saying hes had a offer on the house, and we are  moving to smaller place,again i panic,  he said that im only to take what fits in my car,  so got me thinking about mini albums a bit more  you can fit  more mini albums  in car rather than  12 inch ones  hey

im sorry that  i can not put  the beautiful  photos of the wedding   on here, and so i can not add the  embellishments  so this is just the basis   of the mini album
 I love Beccy Muirs designs of her covers of her mini albums and  decided to  go  with one of her designs  with a wrap around cover  you can see all beccys   cards . stamps she makes .tutorials  on her web site  here   at https://beccysplace.com/

i then went to   Country craft creations  and  seen a  mini album there  that i really love the  designs  of  i have changed some of the pages  to suit me  ,but  i love the structure of the   pages   its on Wish upon a star   papers by  Echo Park,  thats  my next album once i get the papers   in

i have added  a couple of photos from another wedding i  didn't want to  be pulling out photos from my other album to  then  put on here then  take out again to put  back in its own album
in this mini album i have used different  papers  to  make them all are Kaisers collections im trying to use   up   my stash

Kaiser  papers
Back to Basics,
Something blue  (  a  lot of this one )
Timeless
On Stage
the Lake House
 Cottage Rose
Secret garden
Chapter  one
Pen and  ink sticker sheet
my album is  7 inches by 9 inches


hope you like it until next time  
keep safe in the storms  
have fun crafting 
 cheers
jacqui

Tuesday 12 March 2019

SF2019wk11 Bedazzled

hi everyone ,
 its been a while since ive done a challenge & entered  , hoping i haven't forgotten   how to do ,
 for the  past few weeks, i ve been creating  a mini album with  scraps of  Kaiser paper collections that i dont want to just throw away or give away so today started to create the  front cover of  my mini album  on my free day as i call it  , days when im not driving people to hospitals or appointments.

I have used Kaisers Cheusese  paper & started. i just love bling & have loads of it .  Kaisers  being the most in every colour lol   also  Porta Craft  bling

I have loads of flowers when i used to make  Bridal  Bouquets, so now are going on  my  girlie layouts  and mini albums.
I  love the triangle effect. ( in the left hand corner of the page )
On my paper flowers i have added , Colour Blast clear Shimmer   pen,  love anything glittery
i have cut out  the  oval  with  Kaiser dies and placed  photo  behind it , and then  fussy cut some leaves and flowers , those who know me , know that i dont do this often)

Kaiser  pink  & clear  bling flowers have been in the cupboard for years , so now  i just grab stuff  and start using  that for the day.

Also  used in my front cover of my mini album  is  Kaiser Flourish, when i  found out from Kaiser that they no  longer were going to store them, and that  the Kaiser shops near me was closing , i went  and bought as much as i could afford,  in  every colour.  now  have the fun of using them without  going out looking for any it should keep  me going for years  lol
i had added the ribbon and glued it before i saw your challenge ,but it  ties nicely up
I will  put up  both photos  just to show you the  close up view.
thank  you for your  challenge  i hope to  do more  once i get a bit  more free  time


its a bit hard to see the  colour  blast   shimmer  on all the flowers, but it does  look lovely  from my point of view
until next time have a wonderful scrapping good time
i will add the rest of the album on another   page .

cheers
jacqui


Wednesday 6 March 2019

Mixed Gypsys my design team layouts


hi all, welcome to another  of my Design Team   work this time i have created a double layout 
 this time  using   Celebr8  Soul Mates collection
 all products  are  sold at  Mixed Gypsys Scrapbooking  shop at  Hillcrest


products used   
Celebr8 SC6035 soul mates   kit  pack
 Celebr8  chipboards
Colour Blast   colour paste-    Fire Engine
colour Blast   stencil  by Michelle Grant   Say Yes To New Adventures  (  i have not   used the word  New  )
  heart ribbon
cream cardstock
three  photos  -   4  x 6 

before you start  assembling  your layout  please  get your chipboards,  cream  cardstock , hearts , stencil with the  words  say yes to   adventures,  chipboards-  the word  Forever   soulmates i have only used  forever in my layout , but you can add   both words or any other   things that are on the chipboard  and  put the   colour blast  paste on and let dry,
Note,  i only put  mine on thin and then   put it  in front of fan , make sure it does not blow away,  this way ,  it does not take long  to dry, before you can  add them  to your layout, i painted mine then went for lunch   then when layout was  almost finished i then added  them  they were touch dry,( within a few hours)   the thicker you put he  paste the longer its going to take to dry,   you can leave it over night, if you wish (  sometimes i do this   i  do them  last  at night, and then they are ready for next day, but  most times im impatient &  want the layout finished  that day .so  my trusty fan  comes in  handy .
Lets Begin  the layout
Base of your layout,   2  FAITHFUL  . the strips   that you cut off at the bottom  of your 2 sheets , place  double sided  tape on them  and put aside for later  to add to the layout
CUT , one  sheet of  PASSION  pp3501 - 5 " X  10" , stick to page   making  the  smaller  size to the left hand  side of page
      with the remaining  sheet      cut  7 "  X 10 "   to the right hand side of page
from  FRIENDS  papers  cut out  just the two of us,
  from the   pull apart sheets Hold my hand  and Walk with me  you can  add some  string to  the tag or leave it as i have .
place ribbon  on both sides of your layout, then above it  place  the film strips cut to suit.
 with those 2 strips , i asked you to add  double sided tape to , place these  , about   3 inches from the each   edge  ( about half  way between the edge and the   passion papers)
add  one of your photos  portrait,   just us two, and  one heart over the top of that strip,  on the left hand side  and on the right  hand side  add a word   of your choice,  the  grey tag and the other heart .
cut out  Arrow  from  sheet
cut out your words say yes to   adventures and add to the top of your  pages, as shown and  add photos 


ENJOY
 from  Jacqui McCully  DT
  My design team   layout .


Mixed Gypsies scrapbooking arts and craft store my dt work

hi everyone , hows  the week going  i thought   this month i would do something a bit different with   my   conversations. I usually   tell  in a manuscript  how i achieve the  layouts , but now im on  the design team , thinking a bit differently, and see if you would like to  create with me 


 March  collection Celebr8   SOULMATES   COLLECTION

 What a beautiful collection of  reds,  poppies , beautiful words for this months  paper collection

                                       For my layout  today, i have used
With black cardstock, i  placed on the back   with  double sided tape , i used   6 mm  but any size you have the bigger the tape  the less you have to do as you are going to  cut 4 strips  to  12 inches x  .5mm (  very narrow ) and place as shown on my  layout,
PP 3502  Love  as my base
cut Red cardstock 210x 180
PP3501   leave  the hearts on the bottom  on  cut  to  175 x 170 .
Black cardstock  116 x115
white cardstock 150  x 105
my photo is   115 x 100, it was a 4 x 6  but had  chairs  that i didn't need in the photo 
Cut  the filmstrip  from the  sheet     cut out the  middles in  4 places,  and place   from  Pp3506
2  of the   Loves  squares
  in the middle of paper &  from  Pp 3503  cut   poppy
Fussy cut ,  extra  poppys,   just the heads and butterflies
Acacate  sheet ,  cut the  cream hearts,  to  fit the size of your photo , also   here i have  cut out  love this and placed it  on black cardstock  to bring up the words  and placed on the photo
 with  the flowers i  crunch  them a bit   to make them look more real and placed them   at varying angles to  give depth,  the same with the butterflies,  only glued one side and left one side  like its going to  fly away, 
with   PP306   Friends 
on  the  cut outs   i have added  to the world you are only one person  to  cream cardstock  along with  a poppy strip cut to sut the  photo i have cut at  8  inches and placed the  other bit  along the bottom with the  wording .
i have cut  some cream ribbon in half and  made a bow  and  added it to the bottom of my layout ,
I do hope you  try my layout,   of course you can add  other wording to  your layout
Enjoy  
Jacqui McCully DT.

                                                                   A Simple Card  to make
                        cut   CAREFREE   to  12  x 6 inches,  and fold in half.  this is your card 
Fussy Cut   out  the LOVE paper  from the bottom of your sheet cut off  unnecessary  paper  glue to  your card,
 Fussy Cut with   love any other poppies,  and  add to   on top   just moving them slightly above each layer  you can ad how  many layers you like, before  you stick down,  i have  just got my finger  and  dipped it into   colour blast  fire engine and  put it on the edges ( you  can  use  red ink if you dont have   colour paste ) giving them depth .
 I have   fussy cut  a butterfly and  the remember when  off page,  the  poppy  paper  at the top is from one of the strips
until  next time 
have fun scrapping