this is 12 x 12 inch layout


this layout is 8 x 8 inch layout


Bon voyage album
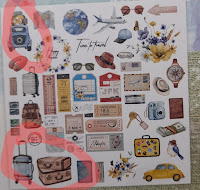
1 packet of Kawaai paper pack Bon Voyage ( memory - place)
14 blue arctic CD 349 Kaisercraft cardstock
yellow cardstock some are just made with scraps for matting & squares
4 different creative memories border punches or your choice of punches
box board 2 sheets
cloth tape but you can use cardstock/ or patterned paper to wrap around
ribbon of your choice i used navy
you can ink if you like also i used card deco deep sea blue ..
i use cloth tape to join for cover album together
15 sheets of 350 gsm white cardstock from Bee Arty ,
extra cardstock or patterned papers for punching
embellishments of your choice i found a dusty attic chipboard which when i go to the retreat i will place the entering the place .


Step one cut 5 sheets of white cardstock to 8 x 8 inch put aside
step 2 cut 5 sheets of white cardstock to 8 x 9 inches and score half a inch on both long sides so it becomes 8 x 8 " glue both step one and step two together . put aside
step 3 , cut 4 white cardstock to 8 and half by 8 and half. put aside
step 4. cut 4 sheets of blue cardstock to 8 and quarter by 8 and a quarter inch join to white cardstock above
step 5 then cut out remaining of blue cardstock 7 and three quarters by 7 and three quarters & join to the 8 x 8 inch pages that you have created before . ( 5 sleeves 10 pages )
step 6 cut 2 box boards to 8 and half by 8 and half
and one piece to 8 and half by one and three quarters .
i put a 1/4 inch binding between each section that gives you enough for bending the book without damaging it .
step 7 after taping your 3 pieces together you can add your blue and white cardstock to the front cover and inside and to the back pages .
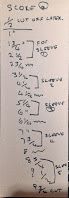
step 8
with remaining white cardstock cut to 8 " x 9 3/4" and score at these measurements
1/2 ". 1 " 1 3/4" 2 & half" 2 and three quarters " 3 and half " 4 and quarter. 4 and half " 5 and quarter" 6 inches , 6 and quarter, 7 " 7 3/4 " 8" 8 .3/4" , 1/2 " 9 3/4 " cut off the first half inch at the start i just find the measurements easier to work out this way
step 9
gather your papers now before i started i cut out 2 bags brown , 2 blue ones & film strips and do any punching you like now so its all ready
i have covered after cutting where i have cut things out of to create some pages .
so now cut 10 sheets of your patterned papers to 7 1/2 x 7 and half inches
front cover
gather your time to travel 6 inch square mat with your chosen colour and then mat again with another colour add back of car, bag on wheels map and your chosen punch along the bottom of page glue to front cover .
inside front cover

page 1 , place your patterned paper down , then add punch design to the left hand side of page then add 3 photo mats 2 1/2 x 2 1/2 "

page 2, found hello word and add gates

page 3 add patterned papers, scrap of wooden sheet , and punched design over the top add double mat 4 x 4 " 4 1/4 x 4 1/4 "

page 4 add patterned paper, glue brown ports that you have previously cut out the map and passport & mat with scraps (brown ) 2- 3 x 3 " photo mats

PAGE 6 get green sheet on the left han side add your circle punch so that only half shows like scallops glue to page , then add wooden section 2 inches wide the length then add 4 .1/4 x 4. 1.4 inch " photo mats or you can just add photos direct


trips to left hand sie of page and time to travel in top right hand corner


page 11 place 2 sheet wooden and green and join with punched add


back cover i have just gather scraps of similar colours and added the car punch to the join in the middle
when you have completed you can add your spine with cardstock and patterned paper of your choice and embellish as you wish
Thank You for looking and hopefully you will create with this beautiful collection
Welcome to a new year, i havent written on here since my mums passing last year, but have been creating a bit this year , best start & add things to here

Today i thought i would create a mini album for my friend, Helen
ingredients used
Bee Arty 350 gsm white cardstock they come in packs of 10 ( ive used A4 cardstock but you can use 12 inch cardstock depending on which size you use, depends on how many sheets mine wasnt a full packet when i started .so if you use scraps for photo mats then only need 4 -5 sheets ,
Kaisercraft range of Lilic Mist collection
lilic mist collectables
purple kaisercrft bling flowers
lilic ribbon from my stash
flourish
chipboard for cover
brass corners ( 4 )
corner rounder
Card deco platinum blue purple ink -- Ink on your patterned sheets
How to create Album cover
(1 ) cut 2 pieces of box board or chipboard out at 6 1/2 x 6 1/2 inches
& 1 piece at 2 & half by 6 1//2 , if you wish to make more pages this will have to go wider for the spine.
(3 ) Tape ribbon to the inside of the chipboard half way in gives it strength , ,on the 2 longer covers to tie in bow when complete ,
(4) join the 3 sections together,keeping a small gap between each for folding your album as a rule its a quarter of a inch, but can be smaller as long as you can bend the book cover keeping the smaller one in the middle ( i use cloth tape )
(5) now starting in the spine area ,cover patterned papers to both outside and inside of spine ( smaller box board ,)
(6) cut 2 peices of patterned papers that measures 8 1/2 " x 7 1/2 "
this goes on the front & back covers. mitering ( cut off the corners of outer edge ) the 2 corners , then fold in .
cut 2 - . 6 1/2 x 6 1/2 " and add to the inside of both front and back covers then add your brass corners
on inside of album i have placed a pocket , as when giving this away as gift , i usually make a birthday card to go inside the pocket
To Create pocket
7 1/2 x 3 1/2" score on 3 edges, mitre the bottom corners,
Hint i add clear tape to half of the folded section around the 3 edges on the inside ,it just stops the card hitting against the half inch bit , ( this is my theory, works for me hehe) then glue to the inside of the front cover, ,
patterned papers is 6 1/4 x 3 1/4" then add bling if desired.
card folder , one cardstock 8 " x 5" score in the middle and cover with deired papers on all four sides or if creating a card create as desired .
Pages
cut 4 sheets to 6 x 6 1/2" of white cardstock, score at half a inch, flatten so its easy to bend either way , here i have used a corner rounder to make a fancy edge on 2 outer edges .
add your patterned paper a 1/4 " smaller and glue to cardstock .
Joining
Starting at one end of your spine, add your pages .
i have cut 5 strips to go over the half inch peices . 6 1/2 x just a touch smaller than half inch , ( 1 cm)
Front cover
here i have inked the edges of the flowers collectables & decorated .
embellish with collectables throughout your album
seeing its a gift i have placed white cardstock with the sizes of photos required for the person or you can add your own photos any size .
2 cardstock pieces 4 1/4 x 4 1/4" inked
4 cardstoock " 3 1/4 x 3 1/4 " inked
3 cardstock " 2 1/4 x 2 1/4" inked


 brass corners
 bling on butterfly
Hope you enjoy this , i certainly did, it only took me around three and half hours to complete ( had lunch also ) and gets some more papers and scraps out of the drawer .
Until next time happy crafting .
love to see your creations. you can find me on facebook & instrgram

 card folder
