Monday, 7 March 2022

Make March PURPLE for Epilepsy

 hi everyone 

 tonight i came across  lots of purple card stock in my stash that i had  left over from my sisters  album  a few years ago, i dont use purple very often , so when  i saw that  Paper  Blessed   had purple  March for Epilespy. what a novel idea to use up the scraps  in the bag ,

 so  i have  made up  my own sketch i found some  8 x 8 inch  pattern  papers ,im pretty sure these papers came out  when i first started  with Kaisercraft in 2007 .but dont quote me i would have to check my files

 so being  8  x 8  inch , i thought i would create  my own size sketch  &  hoping  that it works without too much  loss of papers  you can just do 6x 6 or   can use  12 x 12 inch to create more or less with your papers you have , 

here   i have    Created 8 cards ,wit a few  add ons to create  my cards , i still have cardstock left over so will keep gonig when ihave days free, 

materials  ive used , 

Couture Creations  Cream  blank cards. these are  150 ( 6 inches ) by  105 ( a bit over 4 inches )  ( these come  in a pack of  50 with their envelopes )

card deco  inks   blueberry purple 

daisy's flowers from my stash off the table 

Kaisercraft  SB natural floral patterned papers  a very old collection

 in my collection i had 4 sheets  i haven't used them al up yet , my  sheets ( 8 x 8 inch)  but  you can also add any scrap papers  to use them up .

Lilac Avenue  papers  from 6 inch pad 

flowers 

ribbons  your choice of colours ive used purple 

Enchainted Die Cut words. some of these words will never be used its one way to use them up  to donate them on cards .

A Mothers Art Butterflies 

sweet floral  letters  from  Paqut  de decoupures , this was a freebie from a  crop day, i saw the purples  & thought i can  use that for  purple  cards , 


sketch


Card  one  


(1)   i have used Kaisercraft Lilac Avenue  onto the base card , 

(2)  Mat  your  2 x  5.3/4   inch  pattern  papers  to card stock 

(3) mat letters  to  cardstock 

                                                     (4)  add to card 

Card 2 
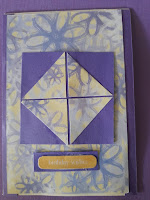
to make the card pop ,bit more i have added a  1 cm strip on either side of purple to save on card stock  instead of using a whole sheet 

(1)  trim   patterned paper of your choice to the  card, 

(2)  mat  to  purple cardstock , i trim after i have placed the  triangles  on the cardstock,  its far easier than trying to make  it fit your card , in case the cardstock  is not square  then you are not fiddling with it .

    (3)  add to   your  patterned papers 

                                        (4)   add your words  here i ave used  Birthday Wishes from the pack &                                                            matted  it 

Card 3 


this is using your  1 and half  by one and half inch squares, 

(1) Again mat  patterned paper to  your card 

(2) add  the 4  squares  to   a purple cardstock .

(3)  add  to card ,

(4)   place  Happy Birthday  to the card  at the top 


Card  4  


(1)  mat lilac cardstock  to  patterned papers  i  allow  only small  margin.   so  2 1/4 x 3 1/4 but if you like  to add a bigger  mat showing,  this is entirely up to you ,

(2) Place  one in the top  left hand corner  of your card, leaving a small  margin

(3)   place the other   matted  sheet   to the bottom right hand side overlapping  at the middle, 

                                            ( 4 )  i have used some material   small  daisy's from my stash  added  one at                                                   top  right hand side  and  2 at the bottom left hand side      

                                           (5)  i have used the  words  Love and kisses  to this card   

card 5 landscape 

(1)  mat  1"x 5 3/4 inch  to  cad stock of your choice 

(2 ) mat  lilac  cardstock to the card 

(3)   I have  more daisy's so have place them across the top of my card 

( 4 )  then placed  the   patterned  paper  under neat it 

(5)   add  your   words  here i have added Birthday Wishes  


Card  6 

for a change i fond a  deep purple card  so have  done it this way for a change and  did another one for  a different   with some  scraps  i found  the punch i  used is EK  2 1/4 scallop  

(1)   attach ribbon to the back of patterned papers and wraparound  the front and attach to the back  with tape 
(2)  mat  2 1/2 x 4 inch to   cardstock 
(3) mat sentlement  i have found a  just for you  and have matted it in deep purple  
( 4)  add  daisy flower  in bottom left hand corner and a mothers art  yellow  butterflies  in top right hand corner and middle  


Card  7  3 " x 2 " 
(1)  mat the 2 x 3 inch  card 
(2)  i have found another piece of scrap patterned  paper an have  used my  trimmer that has  scallops  around  each  side  for another effect, 
(3) add  settlements to the right side of the card. here i have used  
 a special friend 
just for you  
with love 

sorry this is  on its side 

card  8     landscape  card 


you should only have a  2 bits of  papers  left ,  our last card
  
(1)  with the  one inch piece  fold in half ,then at the  folded part , trim away  to make a point in the middle so it looks like a banner or flag 
( 2 )  trim  3  piece  of card stock the same  size. using one of the flags as a template   
(3)  ink all edges 
(4)  place the small long  strip along  the top, leaving a small  gap 
( 5 ) then add the 5   flags alternating colours .i have inked these to make them  pop a bit more 
(6)   add  your words ,here  i have used , green  just for you ,  Lots of love and Birthday Wishes 

hope you like  creating these   these can be in any colours   
until next time ,stay safe   have fun creating 

from jacqui mccully 


Monday, 7 February 2022

Paper Blessed February Challenge- Embossing

                               Paper Blessed Creating Happiness  With Craft. 

                                  With Jacqui McCully -  Design Team Member

Welcome to February,  &  another fun month of Creating . 

                                               February's   Challenge is Embossing, 


so here   ive  made a Card, using  Embossing Folders 

Ingredients 

Da Carte White  bubble 230 gsm   Item  11108 card stock

 Kaiser - blue cardstock 

Inks 

Card Deco 

Blueberry purple

Ultramarine

Mid Blue

sky blue 

Embossing folder is Craft  Concepts  - Ossie dots 

Washi taps  - waves 

 Scrap Matts -Anchor

Ship from stash  ,think its Kaisers 

Uniquely  creative  clear sparkle  brush 

string 

cheese cloth 


Method of making the card 

 ( 1) trim   blue card stock  to  8 1/4 x 6 inches  (  21 x 15 cms )  Score  in half 

 (2 ) cut  white cardstock    to suit  the Embossing folder and  place though your machine , 

( 3) lightly   wipe over  the colours of your inks over the raised  embossed  sheet,  I  dont use a dauber, but you can ,  I have  place  light colours at  the top , darker one to the bottom .

(4)  glue to card ,  add washi tape to the top and bottom  of  card , 

(5)  cut   and pull your cheese cloth to fit over the  bottom of your card,

(6)  cut out a piece of blue cardstock 3 x 3 1/4  inches  or   ( 75 x 85 cms ) 

(7)  cut out your ship  if not a collectable  and glue to  blue card stock, 

(8)  tie twine around anchor and glue into place. with your  pen  brush over the anchor  if you wish to colour your anchor this is ok,  then add  the glitter brush over the top it dry  really quickly 

enjoy  

hope you have a lovely Crafting  day .

Jacqui McCully.


Sunday, 23 January 2022

Bee Arty January Challenge


 yesterday i  noticed a  lovely challenge from Bee Arty,  some of the colours i knew  i didnt have , like Sienna  an tangerine  dream, so went shopping at   scrapbook store ,but came out empty handed ,  Shelley said  maybe i have something at home ,  so came home , and  my mind just goes though Kaisr papers in my head,  and i knew i didnt have any colours like these ,

umm what to do , maybe i could do the sketch,  its been years since ive entered a challenge  page ,  so went though a drawer that i very rarely open  i have had for years not knowing what to do with such papers ,but liked the colours,  and low and behold ,here were the perfect papers to  the colours required . 

 I have used a combination of  papers collections  

 Materials, 

Kaiser  blue bling

Kaiser  light blue cardstock 

Kaiser  journal tags  JT 610 ( 2 )  

Graphic 45  co ordinations  orange cardstock 

Creative Memories,   gum leaf punch

Creative Memories  white cardstock 

Close to my Heart   My Reflections   Happy TImes CC1063 

apricot   spotted  papers 

heartfelt creations  under the sea  paper scraps 

Simple Stories  frame trimmed 

Simple stories from a kit i recently bought from  Fis scrapbooking shop    flowers with buterfly and button and bow

 button from my stash (hand  sewn this on also .

doily cut in  half 

washi tape 

a Mothers Art  blue butterfly

corner rounder 

card deco  Dark orange  ink

embroidery thread  for sewing .

used a gel pen to raw some  circles  on page 

my  layout is 8 inches by 8 inches , 

a good life is from a kit  from simple stories,  


i have hand sewn  ,2022  with using a stencil  that has numbers on it  ive had it for about  5 years  i think this is  the first time ive used it was thinking   of  putting it  in for a destash sale next month, as something i dont use   but may keep it now 

next  punch  out   gum leaves ,  i have used creative memories  white cardstock for this as it works better with the punches from the same range

  cut out papers to  your  page , as  mine is a eight inch page here are my measurements 


orange cardstock is                             8 x8  yours will be  12 x 12  inch 

cut  light blue cardstock to               7 x7 1/2                     11 x 11 1/2 

patterned papers                               6 x 6                             10x10

white                                                    5 1/2 x 5 1/2                 9 x 9  corner round 2 corners 

draw some  circles on your page ,once assembled 

 Ink the pages you want to  ink,   i have donethe white  an around the patterned paper 


add   cut  journal tags  one under  and one over  each side of patterned papers 

mat your photos  with left over orange cardstock  to your desired size   mine is   3 x 4 inch  trimmed just a little at the top , 

add  leaves an flowers to left hand side   

hand sew on button or glue  


Enjoy ,  until next time 


Friday, 7 January 2022

January D.T Paper Blessed Easel Card

                                                         Happy New Year 

Well we are into another  New year 2022. , i wonder how this year will turn out, 

 I havent been on  the blog since my brothers passing, he was my  number one supporter  of my craft, always encouraging me  to carry on  &  to write the news on my  page &   hear my funny jokes that i would put up,

So   a new year begins and  now im on  another  Design team,  Terry would  be encouraging
me to continue  im sure ,so   hoping  that this year will be better than last  year  when he passed .  . 

                                                          For    Paper  Blessed DT  

               For the Month of January,  Anything goes,    Create a  Easel Fold  Card 

                                                     Easel  Birthday Card  

Materials 

Bee Arty   350 gsm   white cardstock  i have   used   a4  but it comes in  12 inch also 

Kaisercraft,    Lilic Mist  6.5  paper pad sheets 

Beccys  Place .   Presents   stamp & dies 

Tim Holtz   Distress  inks 

Mont  Marte  paint brushes  i  like  to use a short stiff brush for my paintings 

Card Deco   - Blueberry  purple 

Black Staz on ink 

A Mothers Art -  butterflies purple 

corner rounder

foam dots 

Rosies studio  Clear  Diamantes 


                         To Create   the Easel  Card 


(1)   cut  1 piece  of cardstock  to  28 cm x 12.5 cm, and score  at 7 cm and  14 cms , 

(2)  cut   1 piece of  cardstock to   14 cms  x 12.5 cms (this is for the easel ) 

(3)  cut    2 pieces  of your choice  patterned papers,  one for inside to write on  the other the front  of card 

(4)  cut 1 piece of patterned paper,     100 x  111 cms add to  centre of front of card ,

(5)  cut 4 pieces of patterned papers  12.5 x 70 cms ( these can be same or different  from scraps )  

(6)  corner round and ink all edges if desired .

(7) Stamp  one present  on white cardstock ,   die cut  out 2    presents   . then colour in on  one only  using  Tim Hotz   Distress inks , let dry , it  does not take long, I have off centered  the blank  die cut at the back with foam dots , join together, 

 and on the bottom of one  present added  the  diamantes , 

add to card,  on top of the  100 x 110  sheet of paper ,

(8)   ink around edges of  Birthday Wishes ,and add  4  clear diamantes  on each corner. 

(9)  Add  A Mothers Art butterflies, 

                                                            Inside of card 

(10) add  2 of your  smaller  papers to the top of the card,  where the score is in the middle 

(11)  choose ,  a border from the back of the pad, add foam dots   &  attach,  one inch from the bottom,  add 3  butterflies,  your easel card will  stand up  now .  

(12) the 2 remaining smaller  papers will go at the back of the card , 


Hope you enjoy  creating   this card , until next month , enjoy your crafting , please enter  the challenge,   they are fun to   do .

until next month  

Jacqui M


Wednesday, 30 June 2021

                                               Box Envelope   by Jacqui McCully


 today  seeing i made  my mum a beautiful  card  5 inches  square  with the flower it made it a bit tight  to place in the envelope  so  decided to  make my own envelope to suit . 

to close  your envelope  there are many ways  i have added ribbon under neath ,before  adding  the patterned papers ,

green cardstock, bought at  bargain plus at springwood 

2 sheets of  Kaisercraft mint wishes  green spot  but you can  have what ever, my mum  loves green any type of green

here are my measurements  

cardstock is  cut  to  7 " x 12 inches, 

you can follow the  pictures to get idea where to cut  off ,

I was going to corner round  the top but  it was  not  in its usual place ,after completing this  i now find it  in the top drawer , i never keep it  there . lol 


score  at 3/4  " ,  1 "   ,  6 1/8 and  6 1/4  "  turn envelope 

score at  2 3/4" 3 ". 8 1/8 " and  8 5/8" 

  make crisp edges  ( fold  close an reopen) 

 for the patterned paper   

cut  2  pieces    to  3 1/4  x  4 3/4"  tape to both sides at top  of the envelope 

        2   1/2"x 4 3/4"  ( flaps )

       1   @   3" x  4 3/4 inside of  envelope (  centre to the top  inside of  envelope_ 

       1 @  2  1/4 x 4 3/4"

       1@   4 3/4 x 4  3/4 "  front of your envelope, any scraps for   writing address  on 

if posting  please check that  it fits  within the size, i usually give my square cards to  close friends and family  so  no posting 


thanks for looking hope you have fun creating  this   if you are hand delivering  your   card and envelope  you can decorate  it wil  flowers or stamps , die cuts   the world is your oyster enjoy and have fun creating


Friday, 26 March 2021

Crafted by ME- with love

 first  challenge of the year  in 2021 ,

                                           Crafted by Me -  with Love   Challenge 


The  challenge  one can use  anything you want to  on your card ,, any colour,  any company, your choice as well as the sketch 

today i  saw a challenge  that i really liked,  its been such a long time  since ive done  any challenges like 2 years, i was addicted to 25 - 30 a month.  but wont be going over board now .

Thanks  very much Leanne for  accepting  me into your group. I have seen  her  group pop  up before , but do i have time.  again i wont go over board  like i did years ago one here and there  might work .  

 Today, Im  making a Birthday Card  for my brother in  law, why  not  do it with the challenge. 

INGREDIENTS 

 Kaisercraft " Open Road "  paper pad  papers ,

Versa Color  54  Brown ink 

black  Gel pen. 

Happy Birthday  out of the paper pad 

white card.   ( from my stash)  

method

I dont usually measure, so today's no different ,  just look at the  sketch  &
  create  it .

I have an addiction of adding  ink  to  the edges  to  make my  edges pop, Here i  have used Versa Color  54  brown ink 

hope you like this  

Have a Wonderful weekend 


Wednesday, 23 December 2020

KOALAS LAYOUT


                                        STUDIO   73 ,  A COUNTRY LIFE  COLLECTION
 I purchased    this  collection of papers from Mixed Gypsy's  scrapbooking shop recently,  what a lovely  range  with  horses,  cows,  koalas,   kangaroos  dingoes &  platypus on it  for   fuzzy cutting. i  look forward to creating lots of pages with  the animals  photos i have . 
 Ive had a photos for many years  that was taken at Australia Zoo, when it first opened  yet still hadn't found any papers to  create til now, 
here i have used
  koala Kisses  
fussy cuts 
frames 
Stripz & elementz 
Tags and  shapes 
my photo is  6 x 8 inch 

METHOD 


(1)  fuzzy cut out Koalas  from  fussy cuts  & koala  as well as  
  the  leaves,   barrel  and flowers  


(2) cut the  2 strips  one with leaves  & place down the right hand side of page ,the other one with  the  red flowers  along some of the bottom to reach the other  patterns  on the paper ,


(3) cut out  the Koala frame and cut in half it  need be , for title,  i then have placed the barrel,  another koala  in behind some of the barrel  to think that hes in the barrel  and the  flowers  at the back of the koala.  


(4) place 2 Koalas over the possum  on top right hand side of page 


Add your photo 
Enjoy