Sunday, 14 October 2018

The Happy craft challenge

The Happy Craft Challenge  - Flowers
Hello, thanks for  having a look  today ,  this weeks challenge - is  FLOWERS
Which to use , i have so many colours , paper. material ones  big ones small ones,  stamps,  dies,  patterned papers
When im undecided , i usually go with the photo then let the juices flow from that as i did  today, bring out all that i think i need,

products used , 
Sopeso Transparente orchid  flowers, Series  2.06  Green Orchid
candle and  molding tools for flowers
Sospeso  transparente  crystal glass
Heartfelt  Creations Botanic orchid   stamp & die set
Heartfelt creations  Botanic orchid  Paper Collection
Kaiser  Flourish  which was a R. A .K ( random act of kindness )  from  Maureen  Wood
Kaiser  black, white and purple cardstock
 Embossing  folder  - Swiss Dots
Inks ,  - Brilliance  Mediterranean  blue,  yellow
           Staz on opaque  cotton white   ( for lace stamp)
Kaiser  Lace Stamp
Close to my Heart   glitter  pen
water colour  paints

 Cutting out , this is not the fun part for me   For those of my friends who know me , i dont do fussy cutting  much, so today this  is rare , this is why its raining here in sunny Queensland lol

Cutting out ,  Heartfelt creations  paper orchids,  Sospeso Transparente orchid  flowers,  the  Botanic Orchid   stamp & Die set

For those who dont know about these Sospeso flowers,(  picture at the bottom ( flat and close up  molded)  they are on a sheet which you cut out , then  shape with  a candle, ( please make sure you dont burn yourself )  molding  tools and a  soft  mat i get  mine from  Auzz Trinkets & Crafts
www.atcraft.com.au - you should check these out  have seen they are  on special at the moment

The molding only takes a few seconds,  so  have everything ready  on the table as you have to work quick &
place the  flower and  shape it with the tool (  there are several sizes ) onto the mat   this gives a depth  and shapes  the  flowers,  I have lots of designs, to choose from,    will go  with the  orchids today,
Next was cutting out the  orchids from the papers collection , Also the bird,  i dont usually add birds to my layouts , but it did look nice,  hovering amongst the flowers ,
  now for assembly time
i always love to work  in a triangle as if im making a flower arrangement , my biggest  flower in the corner  i have placed down the bling,  leaves,  and then assembled the flowers  on top

 Hope you like my layout ,

I had cut  all mine out  of the ones i used today, then thought of  a photo,  this is only a sample of another one  i have  


i think this is 

Symmetrical i work with my flower arrangement 


Thanks for stopping by .
jacqui

now to go and put unused  goods back into the cupboards  but first  afternoon tea, see ya  next time


Sunday, 7 October 2018

the happy craft challenge community group

 hello  how are we today, how was your weekend ?
 
The Happy  Craft Challenge  Community Group
This  weeks  mini challenge is  Maureens  using Stencils,                                                                            I  just love stencils & the things one can do with them , so many choices  to choose from
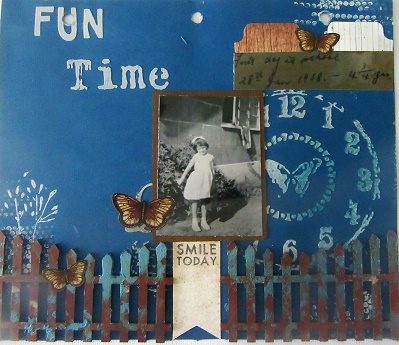
ive been working on my primary school photos & today was   my last  one to do ,
My first day at school
  Products ive used ,
TCW  6 x 6  stencil  clock
Dots  stencil
Amy Tangerine Stencil
Kaiser  mini  Designer Template - Foliage  IT 005
chipboard for fence ,
Kaiser  Chocolate cardstock
Kaiser  base coat collectables
Kaiser    spray mists  -denim

To begin with,  which stencil should i use,  when im undecided. i get out my small dots  i use this a lot. its so versatile

then  thinking  school , so clocks,  ive picked the smaller one of my 3 that i have , it has  words on it as well,  Time
umm  now what,   it needs another name  FUN  yes, this i have on a  Amy Tangerine  stencil, it has 4 words  on it  but  i dont need them all
FUN TIME  yes thats it
i started with gesso, i find this is sometimes a  bit too  thin when i  want it thicker .   the word fun is  done with  gesso,  then with the TIME , i got out my   texture  paste and while i had the clock  in place ,then sprayed   with my Kaiser  sprays   here i have used  Denim
of course  i have to mat the photo  so this is  in Kaiser   Chocolate  cardstock
 now dont you hate it when everything is running good, then  cause im trying to use stuff i found this blue  glue,   that i bought  on a bus trip in toowoomba,  you know i just  had to had it ,but come home get back into routine  then wonder what to do with well,  3 years  later im  going to do something even just glue down  but as i start , its clogged isn't it , so i squeeze the bottle , you know what happened hey,  yes  over  my painted fence,  now what  ! ! !! i dont have a spare fence  lying around, lets make use of it , a few dabs with my hand ,smear here and there , looks  vintage now ,  looks good , ( you know the  saying theres never a mistake   with scrapbooking , only opportunities )  and i quite like it

I  love A Mothers Art  Butterflies,  by  Kelly-Ann Oosterbeek she has designed 10 colours, but today, im using brown, i dont use the browns  ones much


i didn't want to just throw  away mums writing  on the photo , so have included it  on the page, and  at the top have  added   tabs   and Smile Today from Kaiser  Base coat  collectables


Thinking it needed just a touch  more , i have  got out another  of Kaiser's stencils mini   designer  template  Foliage & with my  white gel pen have drawn  in the  spaces,  so it looks like part of a  garden  from the left hand side of the layout

i have just added  3 punched holes at the top, as its going into a  Kaiser  album  for safe keeping ,


Hope you are inspired to   create  something using stencils  this week

I have used  4  techniques  with 4  stencils for this layout

dont forget , Maureen  challenge runs out on Thursday,

Happy Scrapping
jacqui

Sunday, 30 September 2018

the happy craft challenge. using Napkins


My Happy   Challenge  with Megan Flynn

        This weeks  challenge, which is due Thursday , 4th October, is  using a Napkin,                           I have decided to   make a card,
Its been a while, like  6 months,  since ive done an online challenge. but  saw this challenge & thought i would give it a go over the  long weekend .

products used
party  napkins,  ( 2 ply)
Christmas   napkins  4 ply)
Mont Morte  Water colour  paper pad, 300 gsm
Rico Design Napkin glue 130 ml.  (below is the bottle)


Kaiser  Mountain  Air  sticker flowers
  Collall 3 D Decoupage , 
hand made   glitter   mists
Close to my heart - glitter pen
Liquid Drops  3d  rouge ( for berries)
The  25th dec is from  sticker sheet of Photo Play  here comes Santa .
white gel pen
 Kaiser - Lipstick  ink , the green is from  Tim Holtz  distress  inks  - Mowed Lawn 

  My   red napkin is  2 ply,  which  means  i need to only get one layer of the backing  off.
  My other one  is 4 ply, so this works well also , i take off one sheet , put it on my lap, ( for any spills)  next layer i place  under my card, ( for project )  next layer  goes beside me , (in case i  get glue on my hands and i can  clean them ) , LOl and the top  layer  is for the card ,

I love using  short  stiff brushes,  so  have used  Mont Marte  Gallery series  brush acrylic set,  works good with me.  the other long  brushes are just for decoration in my  container
 I   get  the feel of   the brush and i can work quickly if need be .
I started off using  Mont Morte  Water colour  paper pad, 300 gsm   it does not   curl up , as  with using plain  cardstock  which  bends up when you apply  the wet  glue,
                                                                                 
       The glue i  use, when  doing napkins  is Rico Design Napkin glue 130ml.   it  goes on smooth,  the best part is that you dont have to   glue underneath first, but  just apply the  napkin straight to  your project,   you dont need  extra layers like some other brands. so one coat is enough, although if you want , you can add another layer over the top.
When   doing my project, i always start in the centre of my project, and work out,  so that you work on a circle  from middle out all the way   The longer  your strokes, the more  you will get creases and it tears, but i like doing just short strokes to mine i feel  i get more coverage  quicker
so  i started off tonight, with  my red napkin,  when it was touch dry,  i place it in a plastic bag and put it  under my computer  and craft  mat  to flatten  (making sure that its not wet, )  as you   will have it sticking to  your plastic bag. which you dont want that effect , not fun

After  about 20 mins ( i went for tea )   i took out & cut around unwanted parts of the napkin  of the card,
Next   my  green  border   napkin , again , i have placed it on  the white  sheet again  and the same process  as before starting from the centre
 if by chance you  place it down and theres a big crease that you dont want , lift it carefully while still wet and brush over again, making sure you get  out all your air  bubbles as well.
You  need to wait til completely dry, before  using your trimmer on cutting out edges  or you will tear  the  work you have just  completed,
  Collall 3 D Decoupage ,  This   is my life saver,   gone are my days of   foam  tape. for me,  this  you just apply  to  your  project  the thicker you apply the  higher  the  depth,  i usually only  put it on not too thick ,but  thick enough to add height to my project,   it dries clear,  but you are not going to see it anyway,   you can put  unused back into the tube,  but i  just add enough  to what i think, if i need more its easy to  add   the tube has a wide  opening  putting it though the springe, gives you a fine   line  to work on ,
On my leaves  i have added  Close to my Heart  glitter pen,  it just gives   that extra bit of Bling, without  taking away from  the  project,
The  25th dec is from  sticker sheet of Photo Play  Here comes Santa . i have  placed white gel pen around it
I love to ink anything that ive cut,  so  Kaiser - Lipstick  ink & the green is from  Tim Holtz  distress  inks  - Mowed Lawn 


Hope you like my card and play along with this   challenge
 Happy Scrapping
Jacqui

Sunday, 2 September 2018

template Christmas cards

hello,

need  a card in a hurry, but dont have the time to make  a  fancy one, with this template you can create 12 easy cards or more if you cut again  on the diagonal  i have used 2 sheets , you can create these  in in minutes, you can then add embellishments as you wish, be  Birthday, Christmas  or what ever the theme.

 i have only used   basic  products, as i didnt want to get out  embossing folders etc, but again  , this you can add for extra pop . i recently went to  the Crafty Chain last saturday for their  $1.00 bargains  and found  some cute snowmen and snowflakes  to add to my papers not too high  for posting


well,  off to  make some more tonight, i m almost half way, then later on make 12  pretty ones for handing out  at Christmas time

Have fun, til next time we  meet . 
Happy Scrapping 


Friday, 31 August 2018

Blue and white Christmas cards

hi its been  a while since ive been n here, google asked me  last night, if i wanted to stay on here  ohh yes,   i dont want to  lose this , im just getting all  my friends and family to email me on my gmail account,  that i didn't know i had for  4 years lol,  a slow learner, now trying everything found i have a  google earth 

SPRING IS ALMOST IN THE AIR
today i thought i would make my friend a birthday card ,well, it  took most of the morning, as  how to create  one, and tried different techniques to  achieve this then came  back to  my original  design, with a touch of shimmer
after lunch, i thought  get out a bag out of my box  and do some Christmas cards, so decided, that i wont take all day to  do just one, i have  100 to  make  do i have a 100 days before Christmas  to make them   for most of my  cards, they are  sent overseas and far away,  and  i dont want to  add layer upon layer and then not fit into  the envelope,
so thinking , i want to do  blue and white this year, i always do red and green so none today,  lets work with  royal blue and white cards,

  so last year after christmas i saw a one sheet wonder of making birthday cards,  umm,
what if i just do the cutting out  from some and go from there,  so set myself a time , what ever ive done by 4.30 pm, thats it ,  lets go , its  2  p.m  now,  then put papers away, for another day

While at  The Crafty Chain last  month , i noticed some  pretty  blue christmas papers  i know what you are thinking  Kaiser , but no, wow ,this paper is soo georgous  its
Penelope Dee Christmas  Royale
picked  2 sheets and away i went ,
idont want a lot on my table  not much room for that
art glitter glue,  i  hardly use double sided tape any more this one  product does everything i require it to do
Kaiser sticker  merry Christmas 
blue ink, ( cause im going to be working with white cards hey ,
cardstock and cards, 
i dont use pop up dots or foam dots  any more .this  on product called Collall 3 D transparent glue does  it for me


well,  some red have got into the  cards, , i can not help myself  ,L O L but it looks good hey ,
19 cards made ,  one  i made a square card,

Monday, 21 May 2018

kaiser mini album

i have about 3  or 4  of these kaiser book  all  have  journal cards in them , not doing  much,  so  last night ,decided to  start something with them 

her is my cover  before and after ,hard to believe the same book


 i have started the inside   but am going away for a few days  from  home  so wont be  having it with me to  do any more  layouts,  
ive  used  the new Star Gazier, papers,  as the base and   the camera  and the port  and im in love are from 3 other kaiser paper collections,  teddy bears picnic,  wanderlust,  just landed, 
 chipboard is   Kaisers and i have painted with black gesso  then after dried,  i have  put  gel medium and   micro powders over it ,  for a shimmery shine,  which i just love 
until  next week,  hope you all have a fab time  scrapping   

Saturday, 5 May 2018

Stamperia mini album

 Gosh another month gone, the days are flying by

been a bit busy in April, with  drs, hospital appointments  with my mum as she does not drive these days,

  at night,  i have been working on a mini album  which im please about, I saw one of @ Beccy Muir's  mini album at the  world of craft,  (in feb ) so cute i thought , so went on her site and found  instructions on how to create a  mini album with a flap, then did  my own thing.
you can find   her site here , http://beccysplace.blogspot.com.au she sells beautiful  stamps  for all occasions, go have a peek,
although it has taken me  til April to  do the  album.


   Last Thursday, I bought at  Bella Paperie,  10 sheets of  Stamperia  papers - New England ,            & of course if you know me,  it had to be blue, in most of the pages,  I hoped that it would make the album that i needed without running out of paper before i finished  lol

my album is  6 inches by 6 and  half inches .
I have  8  pages
products used are
A Mothers art  butterflies
bling
cream cardstock
blue cardstock
ribbons from  Shelley's land
perfect pearls
mixed medium
washi tape ( black and white
doilies from my stash ( do you have hundreds  like i do in every size ,that you just had to have )
silver rub ons  from  my stash that im sorting
 circle and scallop dies   my first ones i bought from craft online, still  going
Stamperia papers,   new England,
photos - 27 used to complete,  you could add more

hope you enjoyed seeing what ive been up to ,

until next time ,

ahhh,  now ,what to start next